Final Fantasy Aerith Gainsborough Cosplayis another hot choice for these cosplay girls. As the one of the leading characters of Final Fantasy VII, Aerith is a lovely and charming individual in the eyes’ of the players and her followers. Cosplay this final fantasy character impresses us deeply.
Final Fantasy Aerith Gainsborough Cosplay
As the picture shows, this Aerith cosplayer doses a great job that I was shocked by her appearance. Do you also consider her as the fictional Aerith? She really got the key poits of this cosplay, and I could not figure out any of the shortcomings. Her outside looks, body shape, or the exact faces, as a whole, all the aspects even the details are perfect. Of course, the snappy cosplay costume and the wig contribute a lot to her cosplay. In this way, choose the suitable cosplay target and the corresponding suit is the crucial precondition.
On the other hand, if you are really into this final fantasy cosplay and just want to have fun in the show, ok, forget what I said above, all you have to do is to dress the cosplay outfit and the accessories and then enjoy yourself.
Final Fantasy Yuffie Kisaragi cosplay could bring us different enjoyment, especial for those fans of Yuffie. She is an optional playable character of Final Fantasy games presenting is an optimistic and lively image with short black hair in front of the players and her fanatics. In a word, she is a cute, charming and cunning girl.
Final Fantasy Yuffie Kisaragi Cosplay
Although she is glamourous enough to capture both boys’ and girls’ heart, when it comes tocosplay final fantasy Yuffie, more often than not, girls will even more like to do this cosplay. It is because that Yuffie has a cute faces andpetite figure which is suitable for girl.
The cosplay girlin the picture shows a really spiffing appearance to us, and she is an excellent cosplayer. Either her body shape or the Yuffei cosplay costume displays quite perfect semblance. I was really shocked by her and took him as the true Yuffei at first sight. She does a great job, and the character of Yuffei is so right for her.
Wheatley is my current project (at least at the time of writing this post). I've been working on him since April. I'll post the progress so far, then edit as I keep going.
I had plans to cosplay as Edward Elric this year at Dragon*con. Building the arm seemed like fun and I always enjoy seeing good Edward costumes. Then Portal 2 came out. And I played it. And everything changed. The decision that I had to build Wheatley was pretty instant and Edward was tossed out. I wasn't the only one to overhaul cosplay plans thanks to that game. My good friend Lumi scrapped her cosplay plans in favor of GLaDOS, while her husband is going to be dressed up as Cave Johnson. I'm super excited.
Currently my plans are to dress up as Chell and carry Wheatley instead of the gun. My friend Tinnunculus generously volunteered to make Chell's Portal 2 jumpsuit for me, since I'm sewing-retarded and won't have enough time to get it sorted out after getting Wheatley done. I will be making the boots though, which I'll make another post for if those manage to work out.
Anyway. Wheatley. I decided I wanted a Wheatley prop that actually does things, so I'm building this guy as a puppet, making use of the very convenient hole in his back.
I started out with lots of idea sketches on how to get this to work. Some ideas were good, others not so much. But that's how it goes!
I did a lot of research on prop methods and ended up following a lot of techniques from the wonderful Volpin Props. Appropriately, I used a lot of the methods from his first Portal gun build. In retrospect, it might not have been super wise to try to apply them all to Wheatley, but I didn't know what else to do.
First I started out with a block of florist's foam which I glued into a cube, then cut and sanded into a ball; a process that's a lot harder than I figured it'd be.
As you can see there, I drew on the details. Then I used my dremel to carve them out.
This was followed up by coating the ball in Wonderflex.
This stuff is fantastic. I have a feeling it's going to become a staple of my cosplay projects from now on. For those not familiar, it's a plastic-like substance that comes in a rolled sheet. You heat it up with a heat gun and it becomes soft. You mold it into whatever shape you want, then let it cool and it becomes rock hard. Amazing stuff.
Wonderflex was followed up with Apoxie Sculpt, which I globbed on, shaped, let cure, then carved with the dremel.
As you can see there, I was trying to achieve hard edges and add detail. This was a learning process. A really pathetic learning process, honestly. I had no idea what I was doing at all. I sanded and redid all the apoxie on Wheatley over and over again. Each time I got a better handle on what I was doing and understanding how this stuff works, but it took a lot longer than it probably should have.
Once I'd done about half of the apoxie work I moved on to cutting Wheatley in half and hollowing him out.
The inside was then carefully coated in Wonderflex so the two halves could still fit back together.
After he was hollowed and pieced back together, I worked on the raised area that frames the hole on his front. I'm not sure how many times I sanded it off and remade it, but it was a lot. My shakey hands and lack of appropriate tools kept conspiring against me to make the frame rough, imperfect and uneven. Here's one of those attempts:
It was too large and too rough. The picture doesn't show quite how bad it was. The worst problem was that the circle wasn't perfect. Not a big problem when you're just looking at it like that, but once his circular eyeplate was occupying that space, it was going to be a serious issue.
I did a lot of brainstorming trying to figure out a way to make a perfect circle. I started searching "plastic hoop" on eBay one night and dozens of embroidery hoop listings popped up. They come in a wide range of sizes, including the one I needed. A quick trip to Hobby Lobby and my problem was solved.
The back hole didn't need the perfect raised edge that the front hole needed, but I put a second embroidery hoop in there just for the sake of the perfect circle. The side holes don't have hoops so they aren't completely perfect, but I'm less worried about them.
While working on the hoops, I was also making progress on the eye plate. It wasn't completely finished, but at least you could tell what it was.
I also started work on the handles. I ordered a sheet of thick ABS plastic for the side pieces.
Much like Wolf's badges, I decided to recreate high res versions of certain Wheatley parts in Photoshop. His eye, Aperture logo and sticker were remade in the highest quality I could manage.
Honestly the quality is a little too high. They're 300dpi and some of the detail was lost when they were printed. I'm still satisfied with how they turned out, though.
Once I had Wheatley's shell, eye plate and eyelids squared away, I coated them in high build primer, as per Volpin's Portal gun method.
It worked out really well. That stuff is super handy. There were a couple rough spots, but since I'm building damaged Wheatley it's not a problem.
Last week Wheatley saw some light coats of white paint. Over the weekend I added details with Model Magic acrylic.
The next day I mussed up his pristine finish with a long weathering session using both Model Magic acrylic and watered down Basic acrylic.
Did my best to match most of the damage on the Wheatley model. It's not spot-on, but I think it should work well enough.
And that's where we are now! I'll be editing this post with updates, so stay tuned.
UPDATE: Monday, July 25, 2011
Bit more progress to share!
I finally added the details to Wheatley's faceplate. Got the sticker, decal and dots put on. I also added some more weathering because I needed to adjust the heights of the three scratches on the left. The additional weathering turned out darker than I liked so recently I darkened a few other things on the faceplate to distract from that. This picture doesn't show that additional darkening.
Work on the handles has finally turned in my favor.
I've been struggling with getting the proper curved center section for months. Curving the various kinds of plastic I've been using wasn't the problem, but joining those curved pieces securely to the straight pieces was proving impossible. Long sticks like that just provide too much torque for any glue to contend with. In the end I made use of thin pipe which is unfortunately a bit thicker than Wheatley's handles should be, but allowed me a hollow space to stuff with Apoxie sculpt at the joined sections, which made a very secure hold.
For attaching the black side pieces to Wheatley, I had the idea at work one day while staring at my Eve figure, whose arms and head are held on with magnets, that attaching the handles to Wheatley with magnets would be the best solution for making them positionable and removable whenever I need to open Wheatley up. You can see the magnets in the progress pic above.
And here's the finished product!
Well, mostly finished. They still need the foam grips in the center. They'll be getting those this evening. Currently they're drying under a coat of matte sealer.
I also got the stripes on his top and bottom finished off yesterday.
Unfortunately they're not completely accurate to Wheatley's design, thanks to a lack of planning on my part back when I cleared those channels, but they should be close enough.
My current focus is his eye, which bit by bit is coming together.
You can actually still see the details on it when it's lit up, but convincing my little point-and-shoot to show that was just impossible.
And that's it for now! More updates when I make more progress. =)
UPDATE: Monday, August 8, 2011
Update time!
Sadly all of the plans for Wheatley's eye didn't work out as anticipated. I wanted his eye light to be able to move inside the eye plate, but the bike brake cable design I'd worked out just couldn't cut it in such a cramped space. In the end I just glued the eye right into the rig.
This is the puppeting rig. Though his eye light doesn't move any more, it still allows full movement of the eyeplate and eyelids.
A lot of fussing and bad language later and the eye rig has been painted and installed. At long last Wheatley has a face!
All that left were the electronic bits. I spent most of the day yesterday constructing Wheatley's controls and what I've decided to call his brain. The sound module holding his quotes is from the wonderful Replica Props.
Radio Shack must love me.
The audio buttons alone account for a ton of wires. Ten buttons and pos/neg to each means before you even start counting things like amp, speaker, audio chip and his LEDs, there's 20 wires snaking around in there taking up space. Unfortunately the space they're taking up is the spot I'd chosen for his speaker. Said speaker should be arriving this evening (I had to order a new one.. the first one was too big) so I'll be doing some fussing tonight to make it all fit.
That means that the next update should be of the finished product! Hoorjay!!
UPDATE: Monday, August 10, 2011
Done! At long last!! Had a fun little photo shoot last night. Here are the end results!
Finally finished!
Machiavellian.
BIRD! BIRD! BIRD! BIRD!
I also shot a video of his puppet rig at work. The movement's a little rough and he was being kind of squeaky, so I may shoot a better video later.
In summer of '09 I embarked on my first decently complex cosplay project. Wolf O'Donnell from Super Smash Bros. Brawl.
Everything I'd done before then involved just buying cosplay bits online, or altering pre-existing things. I'd yet to really make anything from scratch with much success. I'm not going to say Wolf was made entirely from nothing. I'm not really a competent sewer, so his clothes were all purchased and modified. The from-scratch bit was moreso his head, armor and backpack.
(Apologies in advance for the poor picture quality. I only had my cellphone camera back then).
The first step to this project was research. Tons of it. I found some fantastic fursuit-building resources online. Yes, fursuit. Wolf counts as a partial fursuit and honestly there's nothing wrong with that. Let's all be adults and move on. In all my searching these were the most useful sites I found.
I used the balaclava tutorial from Matrices' site for building Wolf's head and the trimming/painting tips on Beetlecat's site for cleaning him up once he was put together. The LJ community came in handy whenever I got stuck on something and needed help. Penwiper was invaluable for the armor. The craft foam armor tutorial there is amazing. If you ever decide to try out a project like this I definitely suggest making use of the helpful advice these sites have to offer.
Once I finally had a firm grasp of what I'd be doing, I went to work. I bought a balaclava, some elastic, a bunch of upholstery foam and set about building the shape of Wolf's head.
After that I covered the head in masking tape and drew on the details so I could make my pattern.
Then I cut the tape off along the markings and in sections that could lay flat.
It turned out to be surprisingly easy and made a wonderful pattern to work from.
I ordered my fur from imstuffedfur.com. Absolutely wonderful people. They don't show their entire inventory online, but if you call or email them and describe what you need, they'll send you samples. If you need faux fur, that's the place to go.
Once the fur arrived I trimmed it using my pattern pieces and went right to work gluing it on the head.
I was so excited that night I'm pretty sure I skipped sleep and kept placing fur until it was done.
As you can see he was looking pretty poofy and in bad need of a haircut. The following weekend I devoted a lot of time to trimming, combing, hairspraying, painting and installing the eye, nose and teeth.
Amazing what a difference it made! The nose and teeth were made out of sculpey painted with acrylic. The eye was made following Matrices' tutorial. I'd originally intended Wolf have the moving-jaw capability shown at Matrices. The elastic straps are in there, but the way I installed all the foam and fur had basically rendered the jaw immobile by this point. I was able to move it a little bit if I really tried, but in the end the open jaw only really served to provide airflow. Which is okay.
Next I moved on to building Wolf's eyepiece. Although it isn't armor, I used the Penwiper craft foam armor tutorial to make it. So step one was to build it out of black craft foam.
I made the shape of the box out of cardboard to support the foam. The blue lense was made out of the side of a plastic Q-Tip box.
After a week of coating the foam in glue to seal it, I gave it the silver finish, coated it in Future and voila!
I also gave the eyepiece another layer of black sheer fabric inside to prevent my eye from being visible. The collar seen around Wolf's neck there is just a belt that I trimmed short.
Next it was on to gloves. I found a pair of leather gauntlets on eBay (you can find anything on eBay). Made the claws out of sculpey, cut slits in the tip of each finger on the gloves and pushed the claws through from the inside.
I thought I was going to have to glue the claws into place, but it turns out they were so snug that they didn't need anything else to support them. An important note is that the base of each claw is larger than the rest of the claw to prevent them from just falling out the hole. The bases are also curved into caps to fit the tips of my fingers.
The rest of the claw details were done with craft foam and ribbon. The purple foam was just glued right on as-is. The metallic foam got the armor treatment.
For the shoulder armor I used the same craft foam technique. Here's the shoulder pieces covered in glue.
Really should have laid something under them. They did unkind things to my counter. Anywho, the armor is black craft foam shaped by heat and glued over fabric. The spikes were made out of thin cardboard (I think you'd call it cardboard.. it was a cake box). The details were done with puff paint.
Here it is finished, weathered and sewn to the vest.
Speaking of the vest, it was made using a Converse puffy vest. The original vest went down past the waist, so I trimmed it short, sewed the bottom up, removed a bunch of the collar area at the top and lined it with purple ribbon.
The necklace seen in the picture there was made out of gold-colored sculpey. I don't think I got any good detail pictures of it, sadly.
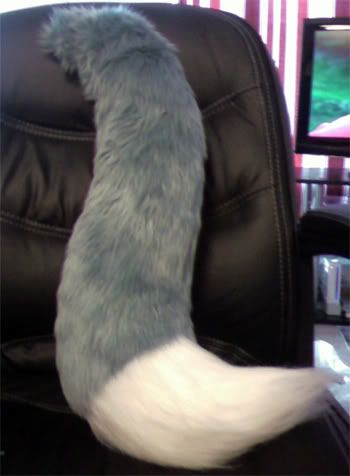
For the tail I followed a simple tutorial that may or may not have been on Matrices' site. I can't remember. You can find a million tutorials for making a simple tail, thankfully.
Technically Wolf's tail should split at the tip. I toyed with this a bit and in the end decided it was beyond my skills to make a split tip that didn't look horrific. So he got one tip.
For the area of fur that shows up on Wolf's arms, I sewed some fur, elastic and ribbon to the shirt that would serve as Wolf's tank top that isn't actually a tank top.
Cellphone mirror pics. Classy.
Next was the backpack, seen here. If I remade the backpack today I wouldn't use the same method I used for this, but it worked well enough anyway. By this point I was so accustomed to using sealed craft foam for building things that I decided to use it for this too.
The light in the middle is a little LED push light you're supposed to stick to a wall. Overall it looked pretty rough, but once painted it was alright. Not fantastic, but y'know.
Boots and knee armor were both assembled using pretty much the same process as the gloves and shoulder armor. Craft foam all around!
I didn't build the boots themselves, of course. They're a super cheap pair I found online and didn't mind destroying.
For the badge details on Wolf's vest I turned to Photoshop. Using reference shots from the game, I did my best to recreate high-res files of the badges.
I printed these onto iron-on transfers, which I transferred on to white t-shirt material. Then I glued that material to black felt, which I glued to the vest itself. I also attached the backpack, which neatly covered the point where the shoulder armor pieces join.
For the gun I went the classic route of modifying a Nerf gun. I grabbed one of these, glued on a few extra details, painted it and there you go.
It's not exactly like Wolf's gun, which defies the laws of physics by having a gigantic knife on the front of it that would prevent it from ever fitting in its holster.
And that was that! There were a few other details that I didn't take pictures of along the way, but for the most part that's every bit of Wolf's construction. Here's some shots the finished product, courtesy my good friend who had a real grown-up camera.
Thanks for reading along! Hopefully this process made some sense. I'm kind of stumbling over this whole blog thing. If you've read over this and have suggestions for better ways to organize future posts, please comment! <3


