Gintama Silver Soul Cosplay Costume & Wig
 Picture from flickr.
You are led here because Gintama Silver Soul Cosplay Costume is sought by you. Do you wanna make a look extremely similar with real roles in silver soul? Here, we make your fantasy come true.
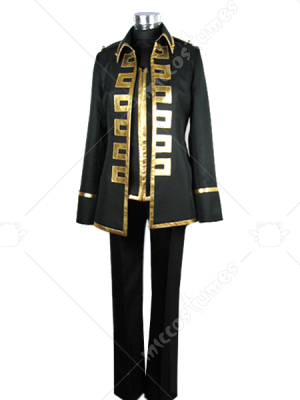
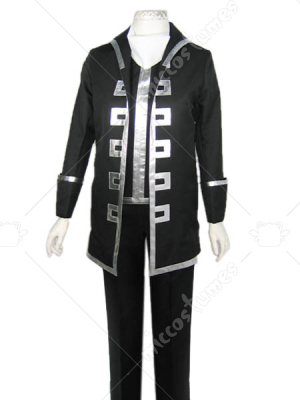
Fabulous cosplay costumes are offered to you. Gintama Silver Soul Cosplay Costume is strictly made as looks in the comic. A black vest with silver pieces is offered. Outside, a black jacket and black trousers are paired. Make sure your look is 100% similar, you also need to put on a white scarf around your neck like the man in the picture.
Another suit for you is Gintama Gold Soul Cosplay Costume. The silver pieces on both vest and jacket have been changed into silver here. Besides this, you will hardly find another difference between these two suits.

Picture from flickr.
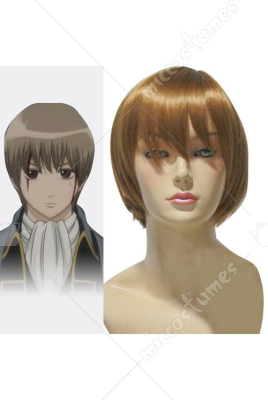
Finally, focus on your hair. We have a large range of cosplay wigs. Just put them on; you can create whatever look you want instantly. Take Silver Soul Okita Sougo Cosplay Wig as an example. The refined workmanship makes it comfortable. It is ready for use.
As for the shoes, you can pick out a pair of black sneakers. This is easy, isn’t? Did you find the headwear on that man? Yes, remember to find it too. The large gun can be found in our collection of cosplay weapons. Want to have a look?
Never will you feel frustrated with your decision of purchasing cosplay costumes & wigs here. Now, check Gintama Silver Soul Cosplay Costume & Wig out below.

Black Butler Ciel Phantomhive Cosplay Costume & Wig


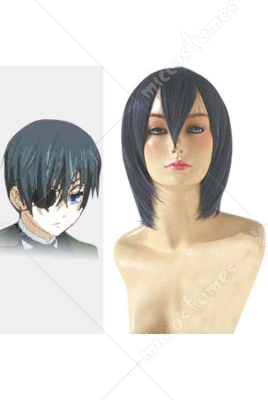
Are you a fan of manga Black Butler? Wanna find fabulous cosplay costume of characters in this anime? Here we offer you the best Black Butler Ciel Phantomhive Cosplay Costumes. Click pictures above and you are sure to get the best deals here.
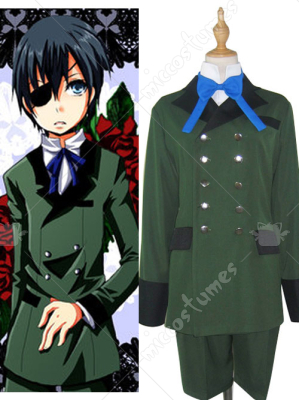
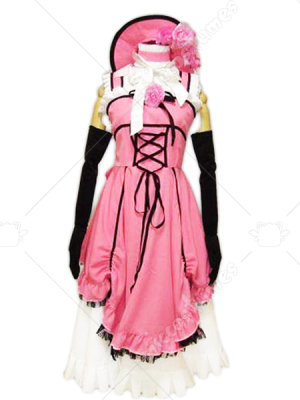
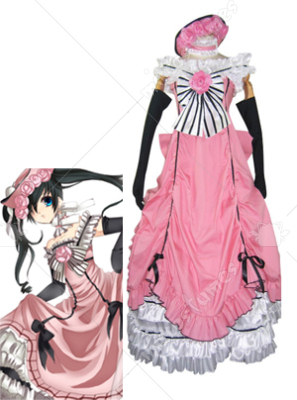
Ciel Phantomhive creates different looks in the Black Butler anime. Our Male Ciel Phantomhive Cosplay Costume includes a jacket, a shirt or vest, a bowknot and a pair of short pants. Of course, we also provide you stunning Female Ciel Phantomhive Cosplay Costume which covers a pink body skirt, hat, headwear and a pair of black gloves.

Picture from: cosplay.
Our Ciel Phantomhive Cosplay Costu. mes are promised to made from quality materials. They are comfortable, durable and easy to wash. Our products also feature perfect similarity as they are carefully made exactly according to what the original character wear. They surely can make you a Ciel Phantomhive in the real world. Custom made services are offered to help you get the perfect fit.
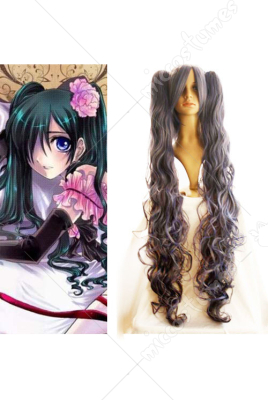
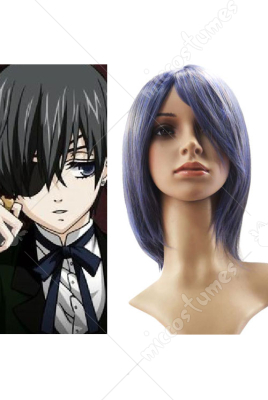
To complete your look vividly, you need to pick a Ciel Phantomhive Cosplay Wig. Click pictures below and you will be guided to our site where you cna check the wigs out easily and quickly.
We guarantee what you see at our site is what you get. We offer competitive prices, free shiping and fast service. You are sure to wow your friends and become an envy of people around you if wearing our Black Butler Ciel Phantomhive Cosplay Costume & Wig.
Gintama Silver Soul Sakata Gintoki Cosplay Costume

Picture from flickr.
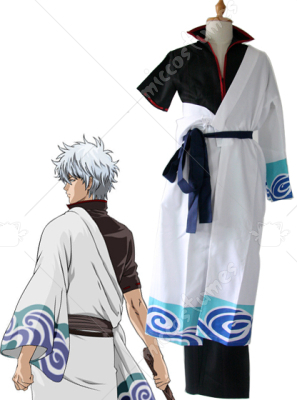
Never have you met better cosplay costumes than our collection. Follow us and buy Gintama Silver Soul Sakata Gintoki Cosplay costume below. Surely, you will never feel regretful for your decision.
Sakata Gintoki wears a white overcoat with blue stripes outside. A black jacket and black trousers are spotted inside. A blue belt is tied around the waist. Yes, the cosplay costume seems much like kimono.

Picture from flickr.
All aboven-mentioned sets are offered by us. 100% similarities are ensured. But to create the real Sakata Gintoki’s look, you need to find his weapon too. As the picture show, Sakata Gintoki uses a short stick and owns white hair. Is this difficult for you? Of course, not. We have cosplay weapon and cosplay wigs. Just take a look. They help you finish Sakata Gintoki’s look so quickly.Finally, pay your attention to your shoes. What to wear? Any black shoes are okay actually.
Now, buy Gintama Silver Soul Sakata Gintoki Cosplay Costume below. You must be delighted by our sincere service and reasonable prices. Fast & free shipping is also found here.
Shining Wind Elmina Rhoderia' Cosplay wand tutorial
Do you know Shining Wind , one of hot games in PS2 . Today, we will show you our latest cosplay weapon tutorial - Elmina Rhoderia' Cosplay wand .


5. Spray epoxy resins on the whole handle, ensuring the whole handle is sprayed with epoxy resins.The handle become firm after solidified by the epoxy resins.The epoxy resins passivate the handle and make the handle tender.

6. I continue to reshape the wand head. The diameter of the wand head is smaller than the original. Then I enlarge it by using knife and wrap the inside of the head with transparent adhesive tape again, making it look bulged

7. Brush the resins and then spray the primer on the wand in order to see the wand in details. (I prefer the black.)

8.Putty the hollow. (Fill the hollow with putty.)Although the resin passivates the paper,the wand is not stiff enough. Thus I do more to make it become better.

9. Rub down the wand and grind the tuber.

10. Then the wand touches slippery after the above procedures.

11. Spray the mixed paint on the wand.Just color the wand as you like.It does not matter whether the wand is colored like the original or not.I choose the bright color personallly.The bright color makes the wand seem to be plump. The wand touches more bulged than the model.

12. Put the colored wand in a dry place.
13. Find a plastic ball used for Christmas and perforate the two sides of the ball.

14. Perforate the two sides of the wand head too. Insert an iron wire between the two holes of the wand head to fasten the plastic ball.Right now the Elmina's wand in Shining Wind Cross is finished.

The wand is featured with irregular shape but there is no need to follow the original grain of the wand in the game , just look alike will be ok.
The original picture of the wand is below:

Material: PVC water pipe, iron wire,paper,transparent adhesive tape,epoxy resins,putty.
Do the following steps:
1. Bend the iron wire as a circle and insert the circle in the PVC water pipe.

2. Wrap the above with paper and transparent adhesive tape in layers until the wand head appears.The handle just touches concavo-convex, without special requirements.

3. The shape of the wand appears. Some alterations are still needed.I am anxious to finish the wand. Thus I plan to fix the handle in order that the finished part keeps in shape.


5. Spray epoxy resins on the whole handle, ensuring the whole handle is sprayed with epoxy resins.The handle become firm after solidified by the epoxy resins.The epoxy resins passivate the handle and make the handle tender.

6. I continue to reshape the wand head. The diameter of the wand head is smaller than the original. Then I enlarge it by using knife and wrap the inside of the head with transparent adhesive tape again, making it look bulged

7. Brush the resins and then spray the primer on the wand in order to see the wand in details. (I prefer the black.)

8.Putty the hollow. (Fill the hollow with putty.)Although the resin passivates the paper,the wand is not stiff enough. Thus I do more to make it become better.

9. Rub down the wand and grind the tuber.

10. Then the wand touches slippery after the above procedures.

11. Spray the mixed paint on the wand.Just color the wand as you like.It does not matter whether the wand is colored like the original or not.I choose the bright color personallly.The bright color makes the wand seem to be plump. The wand touches more bulged than the model.

12. Put the colored wand in a dry place.
13. Find a plastic ball used for Christmas and perforate the two sides of the ball.

14. Perforate the two sides of the wand head too. Insert an iron wire between the two holes of the wand head to fasten the plastic ball.Right now the Elmina's wand in Shining Wind Cross is finished.

Cosplay Wig: A good resource

While browsing around, I found a web site about cosplay wig and I think this is very useful for you. Here a good example of their work a Sora look hair
Easily straighten your synthetic wig
Another wig tutorial, maybe you in hurry, no time for looking a straight wig for your cosplay event. Here a good tutorial straightening your synthetic wig.
Many thanks to pattasy
Gin Tama Kagura Cosplay Costume
 Picture from www.flickr.com.
Looking for cosplay costumes? If so, you must be willing to stop at here. Never did we make you customers disappointed. This time, Gin Tama Kagura Cosplay Costume is introduced to you.
Another darker red suit is Gin Tama Kagura I Cosplay Costume. It is completely the same with above costume expect the hue. Being crafted from cotton canvas and soft loneta, it must be incredibly comfortable.

Picture from www.flickr.com.
To meet all of your demands, here is the fifth suit for Kagura—a white jacket, a brown skirt and a red cravat. All these are made to be 100% same with original Kagura’s look.
Any detail is not admitted to be neglected here. Now, follow me. The following is Gin Tama Kagura Cosplay Costume for you. Buy it here; you will also applaud for your decision.

 |  |
 |  |
 |
Wig Tutorial - a restyling tutorial
Here a good tutorial restyling wig. Make a nice curl. Think this quite useful for cosplaying. Have a nice restyling your wig
Many thanks to nyeve1231
Man chest for Cross Player
This tutorial repost from YouTube. How to make man chest for cross player. Very useful, but you need upgrade you knowledge and skill using air brush. Very useful.
Hot tips: If you have big boobs, bind it.
Hot tips: If you have big boobs, bind it.
Many thanks to WinterKira
Gin Tama Kamui Cosplay Costume

Picture from www.flickr.com.
Are you looking for excellent cosplay costumes? Here, Gin Tama Kamui Cosplay Costume is introduced to you. We totally believe you have known the game or the role in detail. So the following is a brief introduction on the cosplay costume for Kamui in Gin Tama.
Kamui appears with a black retro long gown. The classic gown is added with several buttons that are tied on the jacket with white stripes. Around the waist, a blue belt is worn. Then, a pair of white pants is spotted.

Picture from www.gk-reiko.deviantart.com.
Kamui’s wine red hair is also made to be wigs. So you do not need to dye your hair or worry about the hairstyle as you do not want to cut your hair.


The easiest way to make a Naruto forehead guard

we have post many articles in cosplayclasses , but our webhost get some issues, and we can not get our data back ,especially the post photos. so we will try our best to recover our articles here , and we will continue to post many classic cosplay tutorials here fron now on.
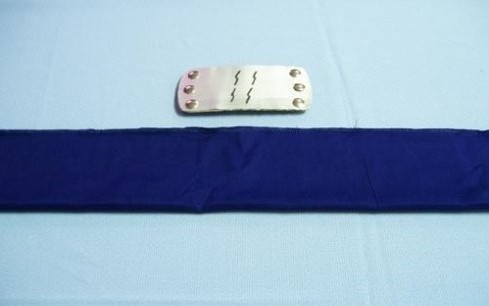
Today, we will show you how to make a nice Naruto forehead guard yourself
To start with, let’s take a look at the materials.

then the following procedure:
1. use your blade or sharp equipment to slot a hatch on the surface of pop can near one end

2.cut of the upper and bottom surface of can with your scissor

3.cut vertical opening on the bottomless can, so it becomes to be a unfolded metal slice

4. turn the inside out, and draw a rectangle with width 5.5 centimeter and length 12.5 centimeter with mark pen

5.then draw a curve on each corner of it
6.cut the drawing off

7.place the can slice on a prepared paper board, and draw a similar shape on the board.

8.cut the drawing off too

9. fully cover double-sided adhesive on one of the paper slice

11. then, mark 3 point on the left and right margins on the can slice

12. spear the 6 points with 6 tucks, then the center of the forehead guard is done

13. draw the icon of ninja village you’re about to make. (PS: do not copy the instructions, you can choose any icon you like)

14. cut off the icon
15. stick the icon on the forehead guard with double-sided adhesive
16. color the margin of paper board with silver hue and brush
17. scissor the cyan cloth in rectangle with width 17 centimeters and length 78 centimeters, then fold the cloth in width
18.cut off a triangle shape on the two end of cloth
19. cover the adverse side of forehead guard with double-sided adhesive
20. unfold the cloth, stick the forehead guard in the center of it
21. cover one side of a paper board with double-sided adhesive
22. stick the paper board in step 21 on the adverse side of the cloth, when you’ve done, the cloth should be nipped in two paper.
23. cover the other side of paper board just adhered with double-sided adhesive
24. fold the upper and bottom margins of cloth towards the adhesive façade
25. reverse the triangle part of an end
26. sew the corresponding margin of the triangle with needle and tread
27. sew the fold line in all margins, in the reverse side, use adhesive to stick the cloth on the material

28. then you’ve done the gorgeous Naruto forehead guard.

Subscribe to:
Posts (Atom)